After making several pairs I’ve converged on a technique that differs significantly from the patterns I started with, so it seems worth writing it up.
What you need
Sock yarn: I use a 4-ply yarn made from 75% Merino wool and 25% nylon. I’m slightly allergic to wool, but Merino seems to be OK (it’s lovely and soft). You need the nylon content, otherwise they wear out really quickly. A pair of socks in the smaller of the two sizes given here uses about 60g of this. A longer pair in the larger size uses 85g.
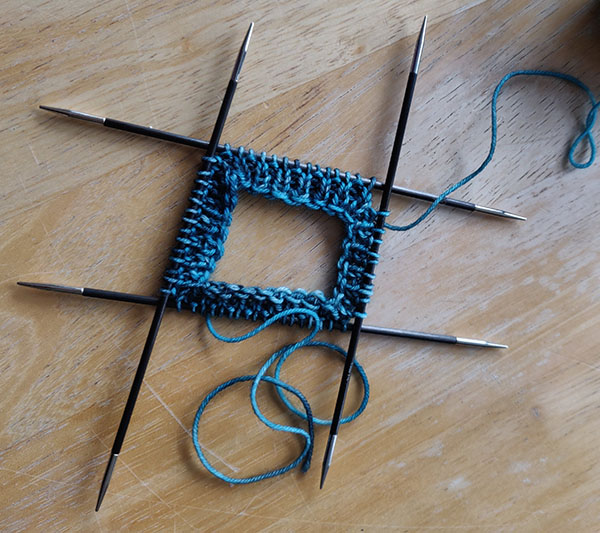
Needles: I use a set of 2.5mm double-pointed needles. I prefer KnitPro Karbonz, which don’t feel cold to the touch, and are just slippery enough without being too slippery. They come in sets of five. I find, however, that to make the gusset (the wide bit around the ankle) it’s much easier to use six needles. Unfortunately this means buying two sets, but spares come in handy sometimes anyway. You also need one ordinary straight needle in a slightly larger size, just for casting on. I use a 3mm needle for that.
Tapestry needle: You just need this at the end to do the Kitchener Stitch at the tip of the toe, and to weave the ends in.
Sizing, comfort and fit
The pattern here is based on a module size, which I’ve called n. Socks to fit me (average-sized female foot, shoe size EU 39 / UK 5.5) are done with n = 15. To fit my husband, a man with long feet (UK shoe size 11), I use n = 18.
Socks should have negative ease. This means they should be slightly stretched when you wear them, not loose. Also, it’s very important that the top of a sock is stretchy, because you have to get your whole foot and ankle through the top to put the sock on.
To make a sock stretchy I use a 2×1 rib for most of the knitting. However, I stick to stocking stitch for the sole of the foot (for comfort, because it’s smoother) and I use a slipstitch rib for the heel flap (for durability). I start with a tighter band of 1×1 rib at the top, to stop the leg sagging.
The method
This is a top-down sock pattern. I use ordinary knitting abbreviations.
The leg
Cast on 4n – 4 stitches (that’s 56 stitches for the smaller size or 68 for the larger one). Use a very stretchy cast on, and do it with a 3mm needle (one size larger than you’ll be using for the rest of the work). I use the Estonian (or Latvian) Double cast-on. Instructions for this are in Leslie Ann Bestor’s excellent Cast On/ Bind Off book, which I recommend. Using a suitable cast-on is extremely important. Socks that aren’t stretchy enough at the top are unwearable.
Join the stitches into a round, and start working on five 2.5mm double-pointed needles (so you have n-1 stitches on each of four needles, and one needle more to work onto).
Do about 12 rounds of K1 P1 rib to start with. The exact length of this ribbed section is a matter of taste, of course. At the end of this, increase by four stitches, evenly distributed around the sock (one for each of four needles). Now you have n stitches on each of four needles.
Change to 2×1 ( K1 P1 K1) rib, and continue in rounds till the leg is long enough. This length is also a matter of taste. For my socks, I like to make the leg about 40 rounds long (plus the dozen rounds of 1×1 rib at the beginning). My husband likes longer socks, so I do 60 rounds for his.
When thinking about the design, I find it really helps to consider the 2×1 rib as “K1 P1 K1” rather than “K2 P1”. If you do that, then you naturally place the repeats of the pattern symmetrically. Later on, when you’re doing the shaping, it comes out looking neater.
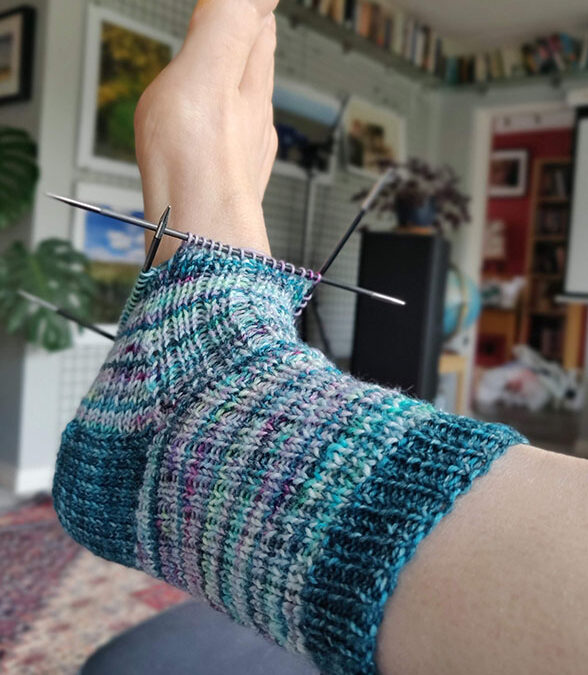
The heel flap
Leave 2n of the stitches (half the total) on two of your needles. You’ll be joining these stitches in again later, after you’ve turned the heel. You could put them on a stitch holder if you prefer, but I find with the Karbonz needles, which aren’t too slippery, I can just leave them sitting there. These stitches are the ones that will be at the top of the foot.
Continue working to-and-fro on the other 2n stitches, in slipstitch rib. It goes like this:
- (right side) [Slip one purlwise, K1] repeat to end
- (wrong side) Slip one purlwise, [P] repeat to end
Repeat those two rows n + 1 times (so that’s 16 times, or 19 times, depending which size you’re doing).
Turning the heel
This is the fun part. Continuing on the heel flap stitches, starting with the right side, do the following four rows:
- (right side) Slip one purlwise, Kn, SSK, K1, turn (leaving n – 4 stitches on the left needle)
- Slip one purlwise, P3, P2 tog, P1, turn (leaving n – 4 stitches on the left needle)
- Slip one purlwise, K to one stitch before the gap, SSK, K1, turn
- Slip one purlwise, P to one stitch before the gap, P2 tog, P1, turn
Then keep repeating Rows 3 and 4 until you have used all the stitches, ending with a wrong-side row.
To confirm this is working, check when you turn at the end of Row 1 that you have n – 4 stitches remaining on the left needle. Similarly, when you turn at the end of Row 2, you’ll have n – 4 stitches left. So the heel is symmetrically placed under the foot.
The gusset
Now we join it all back up into a round. This is the stage where I find it really useful to work with six needles.
You just finished the heel turn with a wrong-side row, so you have the right side facing, and you should now have just over n stitches on the needle (it’s going to be an even number of course, so for n = 15 you have 16 stitches at this point, and for n = 18 you have 20). The detail of what you do here depends on how tight you want the foot. When working with n = 18 I usually reduce the width of the sole of the foot to 18 at this point by doing two more decreases; for n = 15 I leave it at 16. In any case, start by knitting across those stitches (across what will be the start of the sole of the foot), putting in the decreases at the start and end, if you want to do them.
Next, pick up and knit n stitches, evenly distributed along the side of the heel flap. This is what will become the edge of the gusset at the right-hand side of the sock. These go on your second needle.
Now work the 2n stitches you had parked earlier, at the top of the foot, continuing the 2×1 rib pattern. This naturally goes onto two more needles.
To complete the round, pick up and knit another n stitches, evenly distributed down the other edge of the heel flap, heading back towards the sole of the foot. This naturally goes onto a fifth needle, which is why I think it works so nicely to have six at this point (five for the five sections of the round, and a sixth to work onto).
Now you have approximately 5n stitches (with a bit of fudging of the numbers at the sole of the foot). Do a complete round to establish the pattern, continuing the 2×1 rib from the top of the foot, and also doing the sides of the gusset in 2×1 rib to match, but keeping the sole in stocking stitch (K only), so that it will be smooth under the wearer’s foot.
Continue in rounds, keeping the ribbed pattern going, but decreasing by one stitch on each side of the foot on every other row. Make the decreases look pretty by being consistent about how you do them. I like to do them at the top of the gusset, using K2 tog at the right-hand side of the sock and SSK at the left-hand side. But there are several other ways to do this. You could experiment with having the decreases at the bottom edge, and using a different decreasing stitch.
Do that until you are back to 4n stitches (the same number as on the main part of the leg).
The foot
At this point I like to go back to the normal set of five needles. The two that hold the stitches that began on the sides of the heel flap now only have about half-n stitches on them, which is too few to work with. So I transfer half of the (approximately) n stitches of the sole of the foot to each of them, and we’re back to a symmetrical round based on four needles, with a fifth one to work onto.
Continue in rounds with no further decreasing until the foot is as long as you want it. I suggest you measure against a pair of socks that already fit the intended wearer comfortably. For mine, I make the entire foot (including the gusset) 62 rounds long (counting from the edge of the heel flap). For my husband’s, it’s 75. But, really, you should measure this for yourself. Most people have one pair of socks that fits them already.
The toe
Start at one side of the sock. Make sure you are in the right place, otherwise the toe won’t be symmetrically placed! Work in rounds as follows:
- [K1, SSK, K(2n – 6), K2tog, K1] twice
- K
- [K1, SSK, K to 3 stitches before the middle, K2tog, K1] twice
- K
Repeat Rounds 3 and 4, either two or three more times (it’s two more for the smaller size and three for the larger one). Then repeat just Round 3 (in other words, decreasing in every round) until you have just fewer than n stitches left (it has to be an even number, so for n = 18, stop when you have 16 stitches; for n = 15, stop at 12). At some stage during this, you might find it convenient to reduce the number of needles you’re using.
Finish the toe by grafting the ends (the modern name for Kitchener Stitch). This is well described online at Tin Can Knits, and in the Cast On / Bind Off book that I mentioned before.
Colours
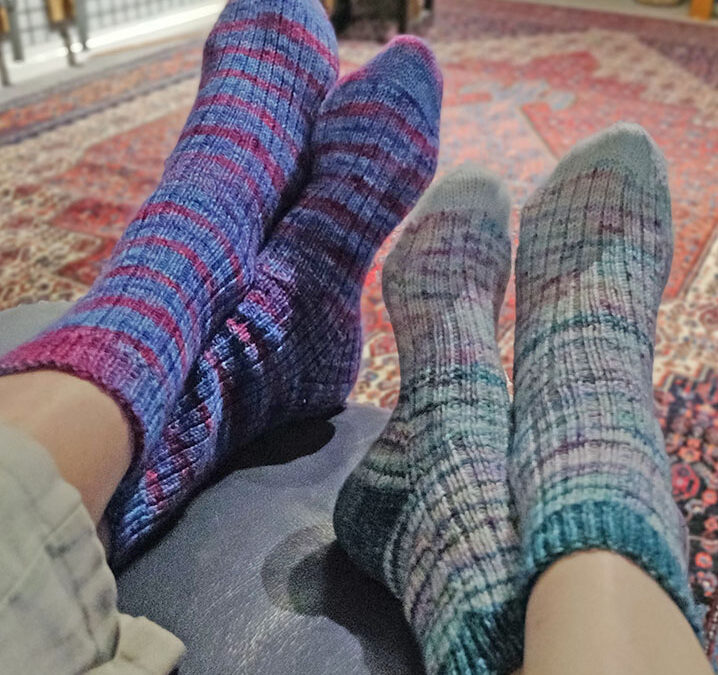
For my green socks, I used a mixture of three different yarns; I alternated them more or less, trying to randomize it a bit while doing the first sock, and then copying what I’d done for the second one. For the heels, toes and cuffs I wanted an effect like the points of a Siamese cat, using the dark green as a highlight. However, I hadn’t enough dark green yarn when I got to the toes, so they are in one of the other colours.
I knitted the blue-and-magenta socks from a single space-dyed yarn that I bought at a craft fair a couple of years ago.
[Updated 6 July 2022 to clarify details of the heel turn and stitch count for the sole of the foot, and 8 Mar 2024 to add a link for the grafting technique.]